Bajaj Chetak Classic electrical systems
|
PX200 wiring with self starter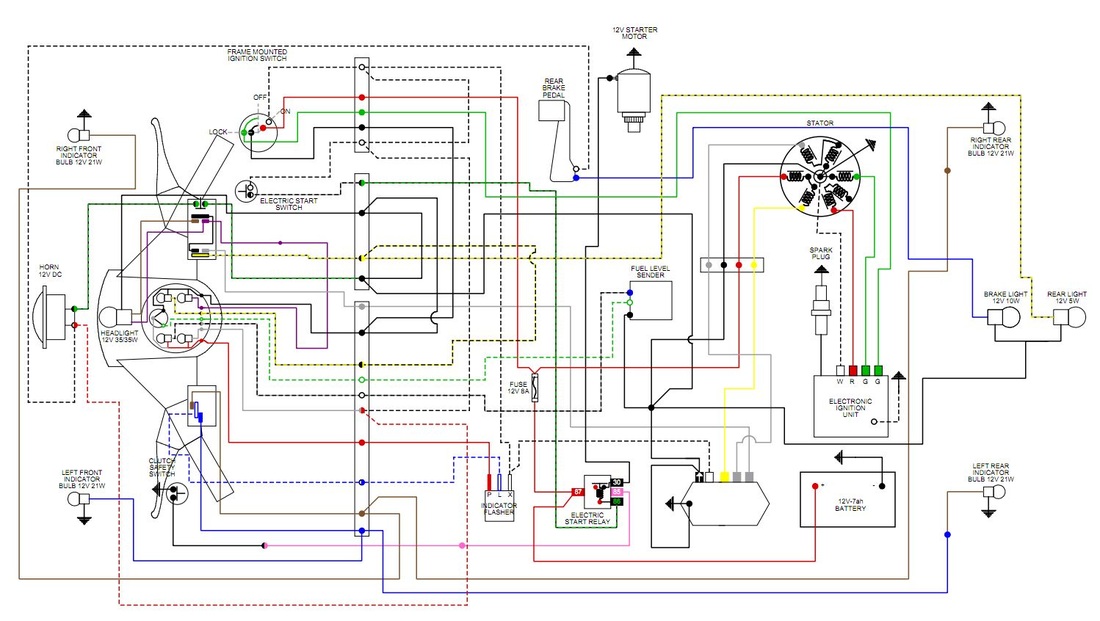
|
Bajaj Vs Vespa - Wiring comparison
The Bajaj Chetak Classic SL and Vespa are VERY similar in wiring but have annoying differences that can drive you bonkers unless you sit down and think about how electrics work.
The biggest difference IS going to be the horn, the later Vespa's used an OPENER type horn whereas the Bajaj uses the older SHUTTER type horn which means you have to buy the right switch otherwise your horn will simply not work.
That aside, it is literally a case of identifying which circuits do what, identifying which of those circuits are where in your Chetak and marrying the new switches and bulbs onto existing circuits.
I used the PX200 Vespa diagram above for pretty much everything except the horn and main light switch.
The Speedo dilemma
Pictured above is the pre printed circuit EFL speedo that I used, simply because it looked good, had proper directional indicators and was marginally cheaper than a MK1 surprisingly which requires a different headset top or the later Disc type with the printed circuit and car type bulb holders.
It uses a communal earth for all circuits, the bulbs are T5 - 286 which I have replaced everything BUT the indicator bulbs with LED's of the same fitting, you can cut corners too such as wiring the speedo illumination AND the "lights on" light from one feed with a spur feed coming from the full beam circuit to power the full beam indicator which is a requirement of law here in the UK to have working.
It also uses the older screw type speedo cable which isn't going to snap off after the third or fourth attempt to get it off.
However it is a BIG unit and Bajaj Chetaks have a lot more free space in their headsets than Vespa EFL's do and Bajaj use a lot of wiring in the headsets, take that into consideration as I realised after that I should have taken all the wiring through to behind the horncast instead of the cramped conditions inside the speedo well.
Indicators
The Bajaj uses a simple three wire system which is basically a feed which is switched into the left or right circuits, there are plentiful supplies of Vespa 3 wire out there, using the wiring diagram above you can identify where the green and blue wires are and wire them in easily.
The indicators I have used are some cheap pod LED's I found on eBay, simply find which is earth and positive on each and it is a simple matter of swapping the wires from one to the other making sure the earth and positives are properly connected.
I would recommend EVEN if the unit is working fine, to invest in a electronic LED capable two pole flasher relay which costs about 4 pounds at time of writing. They use less current draw, regulate the system even if a bulb blows and last 100 times longer than the old relay clicker types. You can if you fit a Vespa PX toolbox actually use the PX indicators but you will have to mark out, make a template and using a dremil cut out the apertures needed for these light units, you cannot fit them with the Bajaj toolbox which is half an inch slimmer on the width dimension and the toolbox actually fouls the area where the lights would normal sit. This is important because the profile of the light units is precise and is designed to fit snugly onto the legshield beading as well as the legshield itself without leaving a gap. If you put it in the wrong place they will look awful and crooked.
If you are looking to remove the cowl lights then read the below paragraphs...
The hardest and most difficult part of this conversion is reaching into the frame to get the wires off the panel hooks, you will need to remove the petrol tank completely and under the plastic drip tray are two spring assemblies, the individual wires that are attached on each are your indicator live feeds. A simple matter of grafting a nice long bit of wire onto each and running them through the top wiring grommet in the petrol tank area to outside and wiring into your existing lights.
Whilst you have the petrol tank out now is a GOOD time to replace your fuel hose, Bajaj are very tight in the hose that you have and you have hardly any room to get your tank out, I added an extra foot to my new fuel line and can balance the tank on the lip of the aperture without straining the pipe.
That is if you wish to remove those pug ugly Bajaj panel indicators on the cowls like I did, it really does tidy up the scooter immensely but each to their own, please ignore this section if you are happy with some of the looks.
Lights
Again Vespa and Bajaj followed much the same path here, the difference being on a EFL type switch there is no option for parking lights whereas the Bajaj has a parking only switch which also powers all the basic light functions such as speedo illumination and back lights.
I used a LML Star 2T 5 pole switch for the lights with the parking light enabled with the lights on function.
Be very careful of the wiring terminals on these switches, they thread out REALLY EASILY!!!! Be gentle, be very gentle.
The wiring itself is straight forward and you will find you can strip one defunct circuit if not two out once you have worked up your test setup as you are wiring directly to feed as opposed to passing from one switch to another as the Bajaj way does.
For the back lights I used a double Cats Eye light unit which does back light, plate illumination, brake and indicators all in one, its totally LED and will use virtually no current at all, I have had my unit on two years and in that time I would have looked at two, three sets of bulbs maybe, LED conversion is not only worthwhile as they are more reliable and can take up to 24v before they really have problems but over the long run they are cheaper too and won't leave you without lights on a dark night as a bulb failure will.
Starter system
This is the easiest part of a Bajaj - Vespa conversion as they both use the shutter type plunger switch with two wires, it is a simple case of cutting off the old switch and wiring in the new and your starter will work just the same.
Fitting the switch will require some drilling under the main or indicator switches where there should be a flat area, you will need some slender nuts and bolts, make three holes, two for the bolts and one for the wires and I would suggest sealing it all with some clear silicon sealant to keep wet and damp from getting into the headset or causing the throttle tube to foul.
You must also ensure that the throttle tube isn't going to foul the wires or break them. You will need to mark out a cutout area in the tube for where your wires will go through, look to your other cutouts to get an idea of how big that cutout needs to be as the width is just for the wires to pass through, the height of the cutout is the max travel possible of the throttle cable and work that out accordingly.
This write up takes into account that the reader is a bit scooter and mechanically savvy, don't attempt things beyond your means or understanding and give me an email for further clarification on the contact page.

